The Phoenix Project

Skip to: New Posts  Last Post
Page:  Next »
Posted by Hakan
3/13/2015 1:25 PM
#51

Been working on the fan shroud. It looks like it's really close to the radiator, but there's more than 3/4" of space for the air to flow. The finned cast aluminum fan motor cover is from Speedway Motors.


Posted by Hakan
5/25/2015 1:00 PM
#52

This doesn't look like a lot of progress, but I had some issues finding the right hood struts for my partly homemade hood hinges. Finally, the third pair I tried worked out as intended. Not sure what car they are supposed to be used on, but it says 400N that I assume means "400 Newton" on them. Looks very simple, but it was quite some work to get here:


Posted by Glens 1965 50
5/26/2015 7:31 AM
#53

Very nice!!  Love the look of those "Boiled Bolts"

 
Posted by gotstang
9/05/2015 4:43 PM
#54

Very nice project You have a Skill

 
Posted by Hakan
1/16/2016 8:56 PM
#55

Thanks!

Made a fan motor cover today and shot a video while I was working on it, the video is full HD and can be watched full screen:


Posted by josh-kebob
1/17/2016 12:37 PM
#56

You da man Hakan.......really enjoy your posts and the craftsmanship involved with your build.......

 
Posted by Hakan
1/18/2016 5:39 PM
#57

Thanks Josh!

Made a similar cover with some stainless screen for the valve cover breather:


Posted by Glens 1965 50
1/18/2016 5:43 PM
#58

A Swedish MacGyver !!

 
Posted by Hakan
1/24/2016 3:06 PM
#59

Replaced the cover behind the steering wheel:

 
Posted by josh-kebob
1/24/2016 6:29 PM
#60

The shoes, it’s the shoes man.’s ................I know it’s you Hakan by the shoes you’re wearing..!!!!!
Nice work too......

 
Posted by Glens 1965 50
1/24/2016 11:38 PM
#61

In IMHO I think it looks great.  Good job Dude.

 
Posted by Hakan
11/11/2017 2:24 PM
#62

Finally done some progress on the Phoenix Project. Several years ago I bought a pair of old rusty Nordan bumpers as I was planning on cutting into them anyway to make them fit the way I want them to fit. Here's some pics from today's session with the front bumper.


Posted by Hakan
11/11/2017 2:42 PM
#63

Almost forgot... here's the sign I made from LED letters that I bought yesterday. The letters were supposed to be battery powered. But I modified them so I can run them from an old desktop computer power supply unit.

 
Posted by almcgee
11/11/2017 3:10 PM
#64

Al McGee from Dallas Texas.  Amazing is an understatement!  I along with many others enjoy watching the Pheonix Project.


Mustang Steve Bash in Gruene, Texas September29-30, 2023
 
Posted by Hakan
11/13/2017 4:13 PM
#65

almcgee wrote:

Al McGee from Dallas Texas.  Amazing is an understatement!  I along with many others enjoy watching the Pheonix Project.

Many thanks!

Not really done yet, but here's the right side of the rear bumper so far.


The Texas license plate I have is of course just there as a placeholder.

 
Posted by Bolted to Floor
11/13/2017 8:49 PM
#66

Awesome fabrication skills Hakan 👍


John  -- 67 Mustang Coupe 390 5 speed
 
Posted by Hakan
11/15/2017 4:04 PM
#67

Bolted to Floor wrote:

Awesome fabrication skills Hakan 👍

Many thanks!

Did the left side of the rear bumper tonight.


Posted by Glens 1965 50
11/22/2017 11:54 AM
#68

I'm glad that you picked the best State in the Union for the License plates.   Bumpers look great.  Are you going to re-chrome them or color key to the car?

 
Posted by Hakan
11/22/2017 7:10 PM
#69

Glens 1965 50 wrote:

I'm glad that you picked the best State in the Union for the License plates.   Bumpers look great.  Are you going to re-chrome them or color key to the car?

Thanks Glen!

Re-chrome would most likely be very expensive so as of now I am thinking about painting them the same color as the body of the car. I am also very curious about what some kind of metal looking, shiny, brushed or even matte vinyl wrap on the bumpers would look like.

 
Posted by Hakan
11/30/2017 4:10 PM
#70

Wrapped the dashboard in real carbon fiber cloth, added several layers of laminating epoxy resin, sanded it smooth and then coated it with satin clear. The clear is actually applied with a brush, but it's six layers of clear and it's been wetsanded with 400 grit before I brushed on the last layer with a very expensive brush.


Posted by hydrantwrench
12/04/2017 1:48 AM
#71

Wow!  What a great project.


"It's better to burnout, then fade away."
 
Posted by josh-kebob
12/08/2017 7:22 PM
#72

Hakan
Please provide details on what you did to the rear bumper......I like the look and don't like the gap on my 65.....like to do something similar...just need details on how you accomplished it.

thanks

 
Posted by Hakan
12/09/2017 10:24 AM
#73

josh-kebob wrote:

Hakan
Please provide details on what you did to the rear bumper......I like the look and don't like the gap on my 65.....like to do something similar...just need details on how you accomplished it.
thanks

I started by cutting the edges of the bumper off and then shaped them to follow the shape of the fender extension and body. I shaped the edge pieces by cutting small gaps into them with a cutting disc in my angle grinder, followed by tack welding, test fitting³, filling the gaps with weld and then grind it all down. 


Once satisfied with the fit of the edge I cut into the bumper itself and shaped it to fit to the edge piece. Same procedure here, cut, tack, test fit and so on. I filled the larger gaps with the same thickness leftover material from the front bumper.


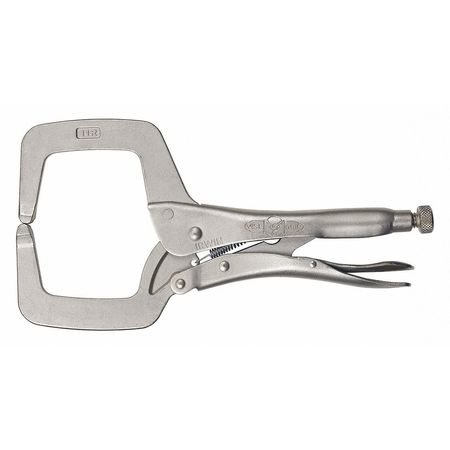
To shape the bumper here on the inside I used this kind of clamp.


Finally, a lot of grinding with a flapper disc in the angle grinder.

 
Posted by josh-kebob
12/09/2017 11:17 AM
#74

Thanks Hakan......the other night in the shop, i was looking at my rear bumper and how it was mounted to the bumper brackets....thought, I might be able to simply shorten the brackets which would allow the bumper to sit closer to the body/body lines......maybe I'll give it a try since I have an extra set of brackets just asking to be cut up!

 
Posted by Hakan
3/24/2019 4:36 PM
#75

Finally an update on the Phoenix Project, here's how I shortened the 2wd Ford Explorer aluminum drive shaft I am going to use:


Page:  Next »

 
Main page
Login
Desktop format