FYI FORD - MustangSteve's Ford Mustang Forum
The Internet's Most Knowledgeable Classic Mustang Information
IF YOU HAVE A QUESTION ABOUT CLASSIC FORD MUSTANGS, YOU HAVE COME TO THE RIGHT PLACE!
MustangSteve has over 30 years of Mustang experience, having owned 30 of them and restored several others. With the help of other Mustangers, this site is dedicated to helping anyone wanting to restore or modify their Mustang.... THERE ARE NO DUMB QUESTIONS!!!!!
Visit MustangSteve's web site to view some of my work and find details for:
FYIFORD Contributors' PICTURES - Power Brake Retrofit Kits for 65-66 Stangs - Classic Mustang FAQ's by MustangSteve - How to wire in a Duraspark Ignition - Mustang Ride Height Pictures and Descriptions - Steel Bushings to fit Granada Spindles to Mustang Tie Rods - Visit my EBAY store MustangSteve Performance - How to Install Granada Disc Brakes MustangSteve's Disc Brake Swap Page - FYIFORD Acronyms for guide to all the acronyms used on this page - FYIFORD Important information and upcoming events

You are not logged in. Would you like to login or register?

6/02/2014 7:56 PM  #1


used an old blanket and some plywood to make a fan shroud

Yep did exactly what the title says but before you conger up images of duct tape and bailing wire take a look at how I was able to make a "fiberglass" fan shroud.

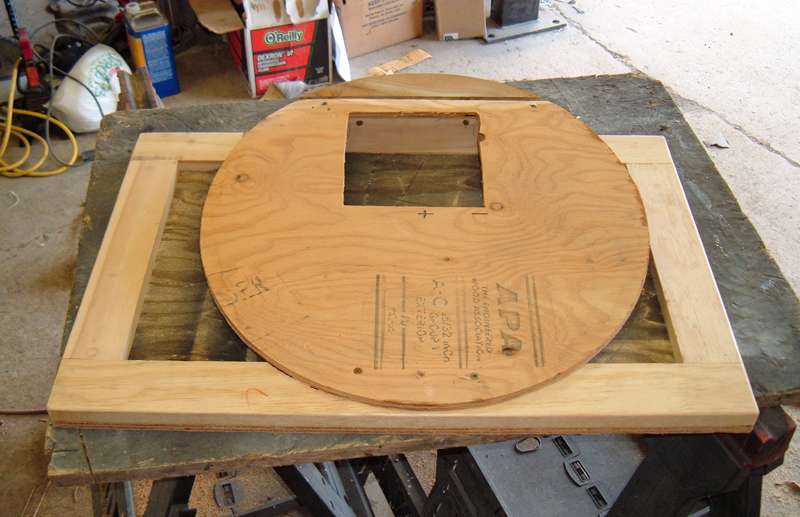
I first started by cutting the plywood and screwing it together to form a plug.


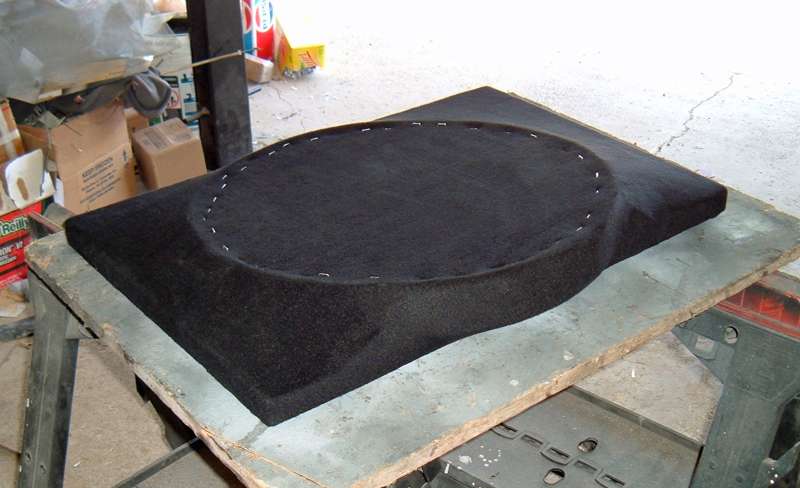
I then draped an old fleece blanket over the plug and began stapling it down.

As the blanket was pulled tight it stretched over corners and provided a gradual change in shape from the main body of the shroud and the opening.

You can already see the shape of the shroud coming together.  My original plan was to make this a two piece shroud.  The middle of the flat edge was intended to be cut away and I was going to use a metal piece to cover the gap.  Once I had the shape I applied a liberal amount of fiberglass resin, and let it harden.

Here you can see the shroud after I popped it off the plug.  The next step would have been to apply fiberglass resin to the inside of the shroud, but I decided that I wanted to make some changes to the plug and try again. The two main improvements I had in mind were  a one piece design and to make the side walls 3/4" taller so there was more distance between the shroud and the radiator.

For the 2nd attempt I reduced the over all size slightly to accommodate for the thickness of the material and the fiberglass, and added the wood to make the side walls thicker.  I then cut an opening in the round piece so I could screw on the top round piece.  the idea here is after the material has been resined I can unscrew the two pieces, pop out the main piece then remove the top round piece.


When I made the first shroud it stuck to the plug in a few places.  I was able to get it out with out issue but figured why risk it and covered the edges with masking tape.


As before I covered the plug with fleece material and stapled it in place.


This material (purchased in bulk from Walmart) was thinner and a little less fuzzy.  This made applying the resin a whole bunch easier.

The whole thing is now drying.  I will add another cote of resin to it in the morning and then after it cures I will remove the plug and do the back side.

This has been fantastic project.  The technique works well and is easy to do.  I can see lots of other applications for this technique.


If it isn't broken...modify it anyway! http://www.DazeCars.com https://galaxieforum.boardhost.com
 

6/02/2014 8:03 PM  #2


Re: used an old blanket and some plywood to make a fan shroud

Excellent, Daze !!!!  I have seen the car shows on TV where they did a similar thing to construct stereo speaker cabinets for cars.  Kudos to you for coming up with the fan shroud idea!   Super cool!  Now a fan shroud can be custom built for any application.


Money you enjoy wasting is NOT wasted money... unless your wife finds out.
 

6/03/2014 5:56 AM  #3


Re: used an old blanket and some plywood to make a fan shroud

2X!!! Heck yeah thanks great idea.


It's hard to type "funny"
 

6/03/2014 6:21 AM  #4


Re: used an old blanket and some plywood to make a fan shroud

Awesome Job....

Last edited by Mach1_Ron (6/03/2014 7:48 AM)


"The OLDER I Get....The FASTER I Was..."
 

6/03/2014 9:40 AM  #5


Re: used an old blanket and some plywood to make a fan shroud


6/03/2014 10:29 AM  #6


Re: used an old blanket and some plywood to make a fan shroud

Very cool, Day.  Thanks for the "How to".

BB


"you get what you pay for, good work isn't cheap, and there are NO free lunches...PERIOD!"
 

6/03/2014 10:47 AM  #7


Re: used an old blanket and some plywood to make a fan shroud

INGENIOUS!
thanks for sharing that, as well as all the cool stuff on your site! (just about to use your roller perch kits)

Last edited by R5CYA (6/03/2014 10:49 AM)


6/03/2014 10:51 AM  #8


Re: used an old blanket and some plywood to make a fan shroud

Cool idea! Never thought of making one like that. You can also use tights they have about the same absorption of fiberglass and ultra forming and light weight. Some like fleece some don't due to it's lower tinsel strength. As the resin isn't totally were you get your rigidity that also depends on the material you use. I'd say it's 50/50 on people liking fleece people Who do subs and that don't like it as it has a tendency to crack easier.  Great idea yet again I think that's how ill do my shroud for my car.


6/03/2014 11:31 AM  #9


Re: used an old blanket and some plywood to make a fan shroud

Do you follow up with a few layers of fiberglass cloth for strength?  Seems like that would be a requirement for it to have any strength at all.


Money you enjoy wasting is NOT wasted money... unless your wife finds out.
 

6/03/2014 12:09 PM  #10


Re: used an old blanket and some plywood to make a fan shroud

MustangSteve wrote:

Do you follow up with a few layers of fiberglass cloth for strength?  Seems like that would be a requirement for it to have any strength at all.

The one I started but didn't finish was quite rigid with a primary cote of resin and then a second thin layer over the top.  Had I resined the back side I am sure it would have been rock solid.  However there were a few spots like the area where the bottom of the opening comes almost all the way to the edge of the shroud that could have benefited from a little glass.  IDK as I sit here thinking about it, it wouldn't be hard to add a single layer of glass to the outside as I apply a second coat of resin.  If I do, it will probably only be a single layer of glass.  I want the shroud to be strong but I don't want it to be to heavy.  The fleece is thicker than normal glass sheets. (so much so that once resined it is probably as thick as 3 or 4 layers of resined glass)  Even though I put a lot of resin on the first shroud it only soaked through the cloth on the corners where it was pulled tight. because of this a lot of resin would have been needed on the back side which would have given me a nice thick shroud.  On the new shroud I also added a wire ring to the fan opening.  This should add quite a bit of strength to the weakest part of the shroud.  It will also be easier to "finish" as I will pull the fleece over the wire and resin it down rather than have a cut opening that would need to be cleaned up to look good.


If it isn't broken...modify it anyway! http://www.DazeCars.com https://galaxieforum.boardhost.com
     Thread Starter
 

6/03/2014 12:22 PM  #11


Re: used an old blanket and some plywood to make a fan shroud

Good thinking on the wire ring.  That will work great. 

As far as strength, I think you might compare it to a window pane.  While it appears very strong and hard and solid, it has no strength if twisted or it gets hit with a impact load.  I am no fiberglass expert by any means, but if you sandwiched one layer of glass cloth on the inside and one on the outside, you would have a very strong shroud.  The tensile strength of the fiberglass cloth makes for alot of strength, where just a plain old cloth blanket would not be as strong.  This would also afford you a little working thickness to use while sanding and smoothing the fiberglass.

Great idea you have, and I am just adding my two cents to try and help avoid a crack down the road.

Afterthought... They make carbon fiber cloth that would look TOTALLY COOL if you put a layer on the exposed side.  It is not real expensive at AIRCRAFT SPRUCE.


Money you enjoy wasting is NOT wasted money... unless your wife finds out.
 

6/03/2014 2:33 PM  #12


Re: used an old blanket and some plywood to make a fan shroud

Daze, why the slanting fan opening in relation to the base plane?

Last edited by boomyal (6/03/2014 2:38 PM)


6/03/2014 2:37 PM  #13


Re: used an old blanket and some plywood to make a fan shroud

boomyal wrote:

Daze, why the slanting fan opening versus the base plane?

because thats how the fan relates to the radiator.  Its not a huge slant but enough that I had to slant the opening so that it surrounds the middle of the fan blades, at the top and the bottom.


If it isn't broken...modify it anyway! http://www.DazeCars.com https://galaxieforum.boardhost.com
     Thread Starter
 

6/03/2014 2:39 PM  #14


Re: used an old blanket and some plywood to make a fan shroud

Well we are waiting to see the released piece!


6/03/2014 3:47 PM  #15


Re: used an old blanket and some plywood to make a fan shroud

MustangSteve wrote:

Good thinking on the wire ring. 
Great idea you have, and I am just adding my two cents to try and help avoid a crack down the road.

Isn't that why we have the forum   one creative mind and his or her experiences are good and he or she can get a lot done.  A whole forum full ideas and experience and we can not only accomplish anything, but the end result will be 10X better.

I decided to add some glass to this. (after reading the coments on this forum and realy thinking through it).  I got some glass cloth.  It is not as forming as the mat but is significantly stronger.  (if you look online the prevailing opinion is the mat is stronger and people who believe that think so (and there is some logic to it) because  the fibers go in all different directions but after looking at some manufactures web sites the reality is the cloth is much much stronger.  Besides what the manufacturers say if the mat was stronger carbon fiber would be mat instead of woven cloth. The "which is stronger" debate is kind of like some of the debates we get on here like the function of a thermostat )

Anyway the cloth had enough give to it that I was able to shape it over the resined fleece.  The rough texture of the fleece actually helped grab the glass cloth and hold it in place.


After I got the cloth roughly shaped I pealed the cloth back, applied resin to the shroud, then reapplied the cloth.  the hardest part was working the bubbles out.  The same rough texture that helped hold the cloth in place also created pockets.  I was able to get about 90% of the bubbles out and the end result should be a good one.


MustangSteve wrote:

Afterthought... They make carbon fiber cloth that would look TOTALLY COOL if you put a layer on the exposed side.  It is not real expensive at AIRCRAFT SPRUCE.

I ended up with that look by accident.  the cloth is woven just like carbon fiber and it turned black when I resined it due to the black fleece I used.


If it isn't broken...modify it anyway! http://www.DazeCars.com https://galaxieforum.boardhost.com
     Thread Starter
 

6/03/2014 3:53 PM  #16


Re: used an old blanket and some plywood to make a fan shroud

awesome how the glass turned black. now you got me wanting to play around with this stuff. i'd like to see if i can simulate the kevlar on my 2-strokes silencers. they have an olive drab look to them. only shiney. (oxymoron?)

Last edited by R5CYA (6/03/2014 3:53 PM)


6/03/2014 4:46 PM  #17


Re: used an old blanket and some plywood to make a fan shroud

How will you mount the shroud to the core support. Perhaps some small 90 degree brackets. I think they will need some reinforcements of some kind because you will be putting a hole in the smallest part of the shroud though.


6/03/2014 5:01 PM  #18


Re: used an old blanket and some plywood to make a fan shroud

MachTJ wrote:

How will you mount the shroud to the core support. Perhaps some small 90 degree brackets. I think they will need some reinforcements of some kind because you will be putting a hole in the smallest part of the shroud though.

Yes there will be some brackets, probably a thin piece of angle iron at the bottom and some flat pieces at the top.  At this point I am thinking I will pop rivet the brackets to the shroud and then glass over them.  Then I will be able to bolt the shroud to the radiator.


If it isn't broken...modify it anyway! http://www.DazeCars.com https://galaxieforum.boardhost.com
     Thread Starter
 

6/03/2014 6:59 PM  #19


Re: used an old blanket and some plywood to make a fan shroud

My friend Mark made a hard top for his Factory 5 Cobra using the same method.


"anyone that stops learning is old, whether at twenty or eighty"Henry Ford
 

6/03/2014 7:02 PM  #20


Re: used an old blanket and some plywood to make a fan shroud

Daze you can make some angle brackets and glass them to the sides of your shroud and they will hold the shroud in place.You should have put your glass cloth on after you wet the flannel you would have been able to work out the bubbles with very little effort, and it would have been as slick as glass.But still it was a slick job that you did on your shroud, can't wait to get started on shroud for my car.


A bad day working on your mustang beats a good day at work anytime
 

6/05/2014 10:23 AM  #21


Re: used an old blanket and some plywood to make a fan shroud

Made some more progress on my shroud.  Discovered a couple of things I did really well and a couple of things that I should have done differently.

First thing I did was remove all the staples from the back side of the shroud so that I could trim off the excess material.  I have an aggressive kitchen knife that I keep in my shop for cutting rubber and other things where normal cutting tools don't work as well and it was the perfect tool to trim the excess.  I was able to use a sawing motion with the blade flat against the back of the plug to cut off the excess fairly close to where I wanted it cut.

With most of the excess off I still had a rough edge that needed to be cleaned up, so I put on my respirator, fired up my orbital sander and sanded the edges flush with the plug again using the back of the plug as a guide.  

Using the plug as a guide gave me a really nice straight edge.

from there I flipped the shroud over and cut away the excess material from the round opening and also  removed the staples from that side.

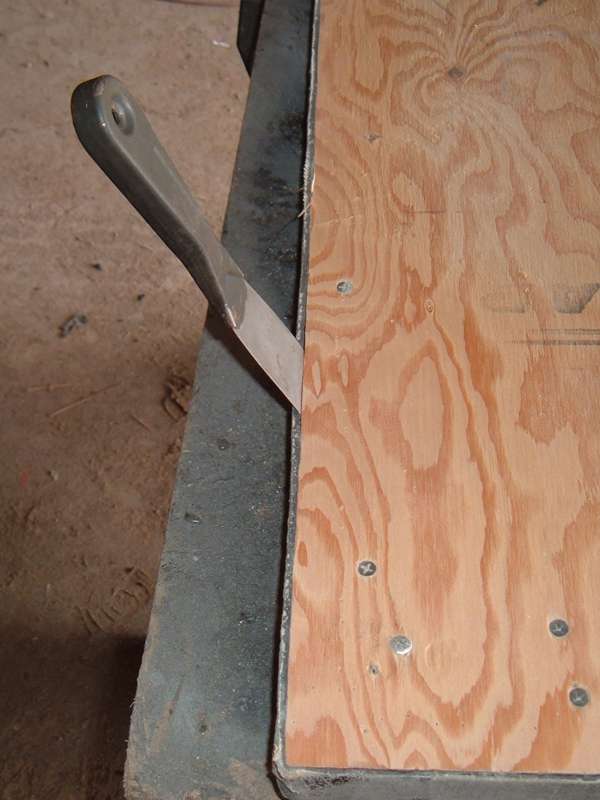
I was now ready to begin releasing the shroud from the plug. I started by gently working an extremely thin putty knife between the shroud sides and the sides of the plug.

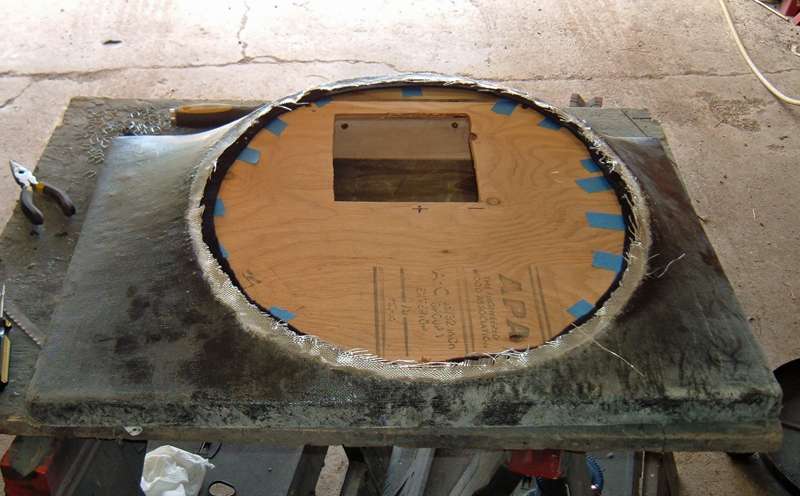
After going all the way around I still could not get the plug to budge from the shroud.  Fortunately for me,  I had had the foresight to build the plug with screws and in such a way that all the screws were accessible (with the exception of one piece) so that I could take the plug apart and remove it one piece at a time.  The first screws that had to come out were the ones that held the half round  top piece to the top of the plug and then the 5 screws that held the main round piece of plywood to the main body of the plug.

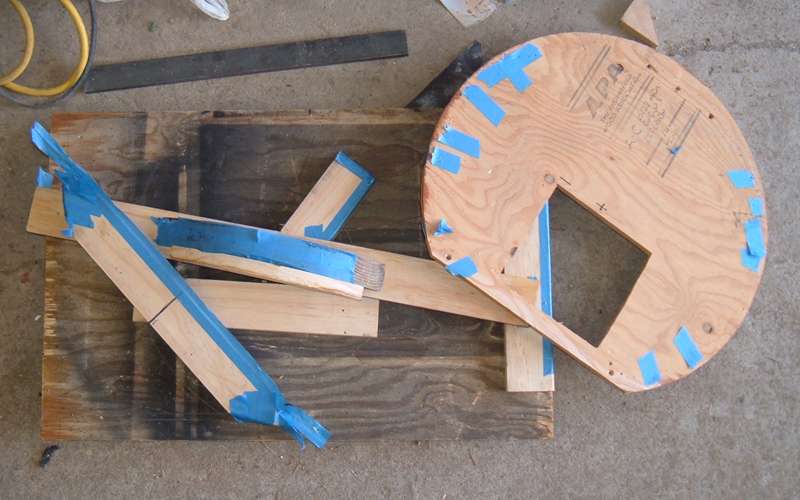
I then flipped the unit over, unscrewed the bottom piece of plywood and began working it loose.  this is where I discovered one of my mistakes.  when I taped the edges to avoid sticking I did not think to use multiple piece of tape and maintain the seams between the pieces of wood that made up the plug.  In other words I had taped over the seams and in essence taped the wood together.  It was only masking tape and I was able to tare it as I removed the plug pieces but it would have been easier had the pieces not stuck together.  If I was doing it again I would have either built the plug, labeled all the parts, disassembled it, taped the individual edges and then put it all back together OR taped it up the same way I did the first time and simply split the seams with a razor blade.


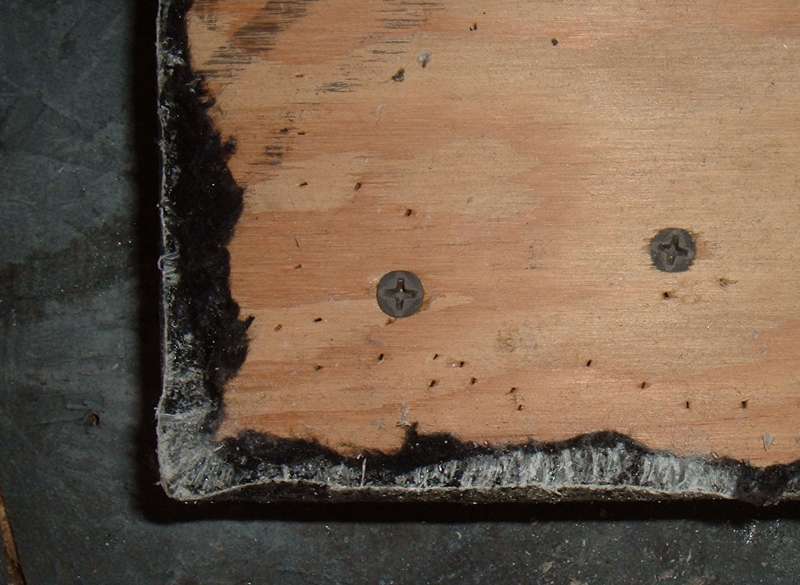
The next image shows why the masking tape was so important.  You can clearly see where the resin soaked through the fleece in the places where it had been pulled tight over the plug and was coming in contact with the plug.  Had I not used the tape the wood would have been in essence glued to the shroud in those locations.  In retrospect the masking tape worked well but I think clear packing tape would have worked better.

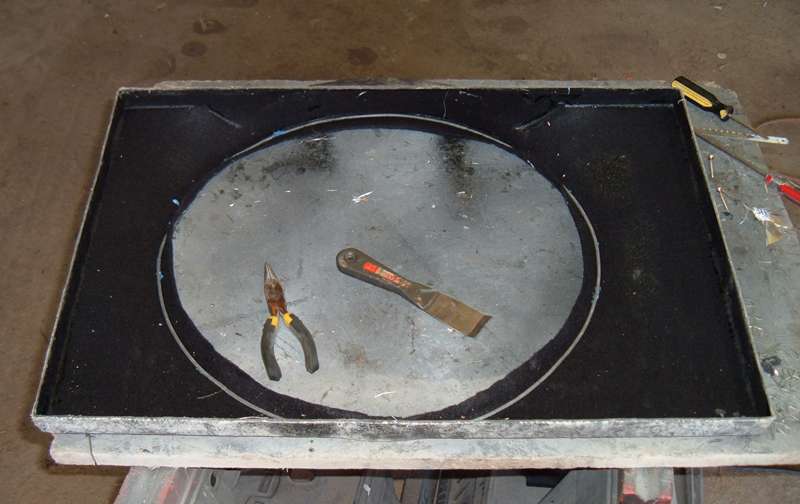
With the shroud out I was able to turn my attention to the wire ring I put in the fan blade opening.  I started by stretching and working the fleece around the wire.


I then applied a liberal amount of resin to the wire, folded the fleece over and used clothespins to hold it in place.  

The clothespins worked well and clamped the fleece down beautifully however they almost ruined my shroud.  I didn't think to put any tape or other non stick material on the close pins and the pressure they provided caused the resin to soak through the fleece and into some of the pins.  About half of the nearly 100 pins came off with out issue BUT the other half were a nightmare to get loose.  They were basically glued in place, most of them broke as I tried to remove them and the wood left behind had to be chiseled out with a pick.  This took a long time as I was walking that fine line between applying enough pressure to get the wood out but not so much pressure as to damage the shroud.


If it isn't broken...modify it anyway! http://www.DazeCars.com https://galaxieforum.boardhost.com
     Thread Starter
 

6/05/2014 10:29 AM  #22


Re: used an old blanket and some plywood to make a fan shroud

thanks for the update. i'm sure i'm not the only one dieing to see the end result! great job so far!


6/05/2014 12:27 PM  #23


Re: used an old blanket and some plywood to make a fan shroud

That is really creative.  How much room is between the fan blades and the shroud?


6/05/2014 5:00 PM  #24


Re: used an old blanket and some plywood to make a fan shroud

Scott wrote:

That is really creative.  How much room is between the fan blades and the shroud?

My fan is 18" so I started with a 20" opening.  As the resin and cloth was added the opening shrunk slightly and now there is about 3/4" between the end of the blades and the opening.


Started today with a test fit, and all looks good.


Once I knew I had the fit I wanted I applied the last coat of resin to the inside of the shroud. I decided against using a layer of glass on the inside. The shroud was already extremely strong and was getting fairly heavy, so I decided the fleece and one layer of glass clothe was enough.  all it needs now is some mounting brackets, a little sanding and a coat of paint and it will be done.


If it isn't broken...modify it anyway! http://www.DazeCars.com https://galaxieforum.boardhost.com
     Thread Starter
 

6/05/2014 6:33 PM  #25


Re: used an old blanket and some plywood to make a fan shroud

OK, I get it now...  Cast about 4 of those clothespins into the schroud and use them to clamp top and bottom flange of the radiator!!!  EZ on, EZ off !

Are you going to sand it smooth or some other thing or just leave it?  Some wrinkle paint would make it look uniform.


Money you enjoy wasting is NOT wasted money... unless your wife finds out.
 

Board footera


REMEMBER!!! When posting a question about your Mustang or other Ford on this forum, BE SURE to tell us what it is, what year, engine, etc so we have enough information to go on.