| ||
Visit MustangSteve's web site to view some of my work and find details for: FYIFORD Contributors' PICTURES - Power Brake Retrofit Kits for 65-66 Stangs - Classic Mustang FAQ's by MustangSteve - How to wire in a Duraspark Ignition - Mustang Ride Height Pictures and Descriptions - Steel Bushings to fit Granada Spindles to Mustang Tie Rods - Visit my EBAY store MustangSteve Performance - How to Install Granada Disc Brakes MustangSteve's Disc Brake Swap Page - FYIFORD Acronyms for guide to all the acronyms used on this page - FYIFORD Important information and upcoming events |
Offline
Kristang wrote:
I believe I just found the issue! I bolted the housing to the intake, tighten the AN nut to the water pump fitting.
.
ok, got it now . . i had no idea you had an an fitting on one end of the bypass . . this is why i kept saying its impossible for the housing to leak using my method and that things did not add up.
the housing is not the problem . . the problem is faulty engineering . . your metal bypass pipe is too short and/or not square with the housing AFTER you tighten the pipe . . you need to make a pipe that is correct no matter what housing you use . . also, if the clearance between the bypass pipe and housing is less than around .002", you need to make it a looser fit then use a slightly thicker o ring.
Also, install housing with no gasket . . tighten the fitting FIRST before even installing the bolts, then tighten the bolts lightly and check for gaps . . if you can not install the bolts, the tube is still obviously not correct.
Last edited by barnett468 (3/21/2015 1:49 PM)
Offline
I can install both bolts and then thread the nut onto the fitting with my fingers. In only need to use my AN wrench to get it to seat the flare. If there is any gap between the 2 it is minimal. The tube does not have an o ring, it is welded.
Offline
Anyone aware of a shim I can put between the flare and the AN fitting if I indeed have too much clearance?
Offline
Kristang wrote:
Anyone aware of a shim I can put between the flare and the AN fitting if I indeed have too much clearance?
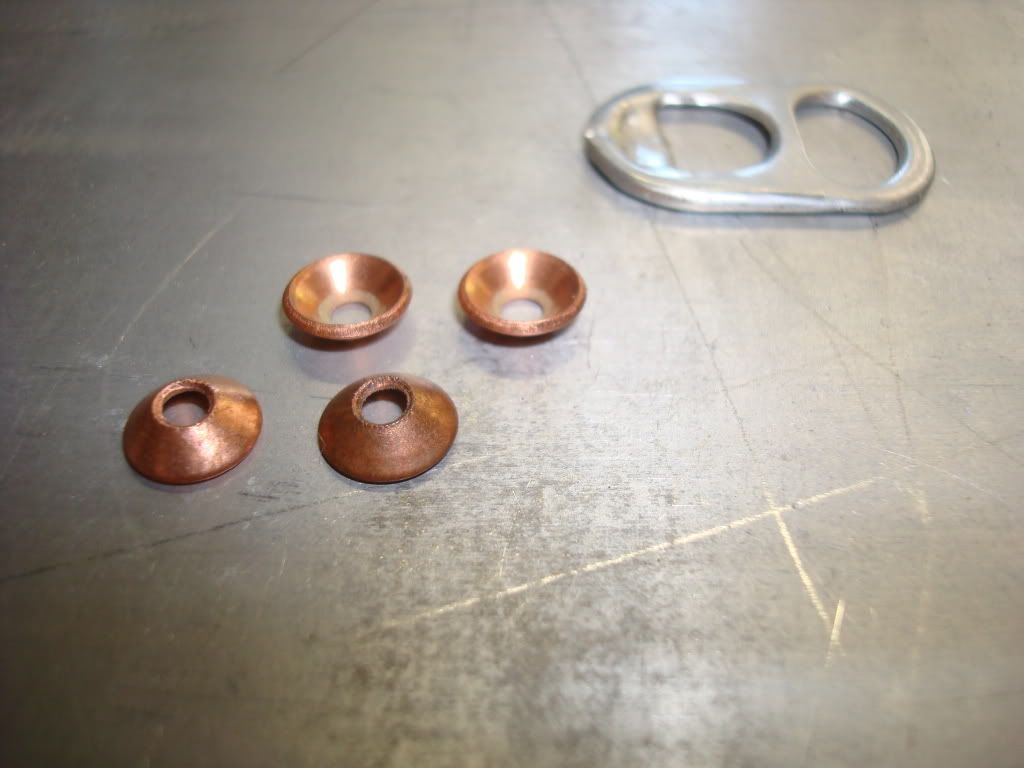
does your an fitting have a cone?
if this is what you need, i would buy several . . i would not reuse one after it is tightened . . if the pos leaks then stick it in the oven on the highest setting for around 30 minutes then toss it in a pan of ice water . . you can also heat it slowly with any torch until it glows then cool it.
you CAN use sealer on them but its best not to.
these will seal at least 300 psi and on a good day they will seal over 1000 psi . . i have had to use them on ac and power steering pressure lines before..
i like what you did and i know how friggen hard it is to do what you did and get it exact so i commend you on your ingenuity and skill.
........................................................................copper cone sealing washers
.................................................................
.
..........................................................................................heres an even thicker one.
...........................................................
Last edited by barnett468 (3/21/2015 6:48 PM)
Offline
Yes it has a cone! Where do I get them?
Offline
Kristang wrote:
Yes it has a cone! Where do I get them?
jesus you want a lot dont ya, lol.
ok, graingers and air conditioning shops and real hardware stores like industrial hardware . . maybe dorman . . i will look elsewhere in a minute.
Last edited by barnett468 (3/21/2015 6:52 PM)
Offline
Sorry to be a PITA. I appreciate the help!!
Offline
Kristang wrote:
Sorry to be a PITA. I appreciate the help!!
.
hey not at all . . just couldn't help myself, lol . . just glad you FINALLY told us what you were doing, lol.
ok, summit has ones that are actual seats for AN fittings. . they may or may not work.
most parts stores [NAPA] can get them . . ask for the air conditioning section in their parts book . . 4 seasons is an ac parts mfg so the store may have a 4 seasons book.
Last edited by barnett468 (3/21/2015 7:18 PM)
Offline
.
put some grease on the threads and on top of the taper on the tube that the nut rotates/spins on.
if you use the summit aluminum ones, do NOT make it very tight or you will destroy the washer.
if you use copper, tighten the bejesus out of it.
Offline
Thanks again! I'll let you know what happens
Offline
I went through this as well and re flattened it with sand paper on a surface plate like barnett suggested- still no joy.
The housing has the recessed lip for the thermostat and that depth must be turned down how ever many thousanths was removed from the flat portion, otherwise the housing will seat hard on the thermostat and not sandwich the gasket with enough clamping force to make a proper seal.
Yeah, on edit realize that I didn't even see all of page 2- either the site or my computer is on the fritz today
Last edited by Jon Richard (3/21/2015 8:47 PM)
Offline
Jon Richard wrote:
I went through this as well and re flattened it with sand paper on a surface plate like barnett suggested- still no joy.
The housing has the recessed lip for the thermostat and that depth must be turned down how ever many thousanths was removed from the flat portion, otherwise the housing will seat hard on the thermostat and not sandwich the gasket with enough clamping force to make a proper seal.
Yeah, on edit realize that I didn't even see all of page 2- either the site or my computer is on the fritz today
yes, this is another xlnt point that everyone including myself failed to mention . . you can lay the t stat in the housing and put a straight edge across it to see if the t stat is above the housing . . if it is, this is no bueno as jon said . . the t stat will seal the big opening but the bypass will not have much pressure on it in that area to seal.
Offline
Just seeing this post ... years ago I had a similar problem and had to use at least 3 gaskets, maybe 4 gaskets, w/RTV, torque it evenly, let sit for several hours. It worked for me.
Offline
Good point on the thermostat depth. It's definitely above the groove now. Time to regroup and start this over from the beginning.
Offline
Kristang wrote:
Good point on the thermostat depth. It's definitely above the groove now. Time to regroup and start this over from the beginning.
Time for one of those billet necks
Offline
.
ok BEFORE you give up i would do the following
make sure the gasket does NOT cover any of the thermostat.
install the t stat in the housing.
lay the gasket on top of it
IF the t stat is below the GASKET surface, you WILL have some crush on the gasket . . if the t stat is more than .010" below the gasket, you will definitely have enough crush on the gasket.
my previous comment was incomplete so sorry about that.
Offline
I did as Barnett suggested. I used a double gasket, I modified one to make it clear the thermostat, and put the other on top. I sourced a spacer to make up the distance from the bypass tube to the fitting on the water pump. I used THE RIGHT STUFF and glued the gaskets together as well as to the intake and the stat housing. I allowed the silicone to set up for 24 hours. STILL LEAKS!!!!.
I was able to source an OE stat housing, so I prepped everything and put it back together with the rubber bypass hose-completely stock. Guess what.....IT STILL LEAKS!!!!
Here is my theory. It is obvious now that it is a problem with gasket surface on the intake manifold, which created a distorted surface from multiple attempts at installation. I held a straight edge against that surface and it's definitely not flat. No good way to flatten it other than to pull it off and have a machine shop cut it or purchase a brand new one. My concern with machining it is I helicoiled the mounting holes and those coils are just below the surface. Are those going to cause a problem?
Offline
I have fixed a couple of those by taking my bench stone which is a 1 inch by 1 inch by 6 inch fine India stone and dressing the surface lightly to find the high spots. 99.999996872543 % of the time there are just a couple of high spots usually around the holes (maybe the ones you helicoiled) that keeps thing from clamping the gasket enough. Once I find the high spots I use a smoothing file to work them down. You should not get enough shavings in the water passage to cause a problem since it is a vertical surface. The bench stone just polishes the high spots so you can see them. I have taken quite a bit of material off with a flat file to straighten stuff like that to not have to remove and go through all that.
Offline
Kristang wrote:
I did as Barnett suggested. I used a double gasket, I modified one to make it clear the thermostat, and put the other on top.
i only wanted you to use 1 gasket.
Kristang wrote:
I sourced a spacer to make up the distance from the bypass tube to the fitting on the water pump. I used THE RIGHT STUFF and glued the gaskets together as well as to the intake and the stat housing. I allowed the silicone to set up for 24 hours. STILL LEAKS!!!!.
I was able to source an OE stat housing, so I prepped everything and put it back together with the rubber bypass hose-completely stock. Guess what.....IT STILL LEAKS!!!!
Here is my theory. It is obvious now that it is a problem with gasket surface on the intake manifold, which created a distorted surface from multiple attempts at installation. I held a straight edge against that surface and it's definitely not flat. No good way to flatten it other than to pull it off and have a machine shop cut it or purchase a brand new one.
.
i do believe you skipped the part below.
from post 31.
barnett468 wrote:
if you want to see if the intake is flat you can color it with felt pen just like you did with the t stat housing then put some white polishing compound on it, then hold around at leas a 1/4" thick piece of steel against it and rotate it back and forth with moderate pressure a few times . . if you dont have polishing compound or a piece of steel, you can use tooth paste and the t stat housing.
from post 34
barnett468 wrote:
ok, something just isn't adding up . . did you check the intake surface for flatness?
.
.
.
Kristang wrote:
My concern with machining it is I helicoiled the mounting holes and those coils are just below the surface. Are those going to cause a problem?
you can possibly color the intake surface with black felt pen then get the 1/4" thick piece of steel mentioned in my previous post that is around 2 1/4" x 2 1/4" and some 120 grit wet dry paper and apply spray adhesive on the steel and a piece of sand paper that is cut to fit the steel, then place it on the intake and rotate it with moderate pressur . . use water or wd40 if you want . . it "should" flatten quickly.
if it hits the helicoils before it is flat, they must be removed.
Last edited by barnett468 (3/25/2015 7:12 PM)
Offline
.
If you need to remove the helicoils and the tabs are still on you “might” be able to grab then with skinny needle nose pliers and spray wd40 on them and spin them out.
Of the tabs are gone, you can use a dental pick or similar to pry the tip down and out then use the needle nose etc.
the holes should be countersunk on aluminum . . this prevents the metal from distorting outward when the bolts are tightened.
these are one of the skinny nose pliars i am referring to.
.
Last edited by barnett468 (3/25/2015 7:28 PM)
Offline
barnett468 has a great point, if the helicoils are sticking out a little they could be the problem. I have won that battle a time or two with a small stone in my die grinder by taking part of that first thread off of the coil. Then smooth the surface.
Offline
Thanks Barnett. I'm just thankful I was able to determine what was causing the issue. I'm going to get a piece of steel as you suggested and use the adhesive spray and sandpaper. DC thanks for the file suggestion, there's just so little room to work. I'll get it yet!!!
I still have the issue of the thermostat surface being above the relief in the housing. Barnett, do I just modify the one gasket to clear?
Offline
DC wrote:
barnett468 has a great point, if the helicoils are sticking out a little they could be the problem. I have won that battle a time or two with a small stone in my die grinder by taking part of that first thread off of the coil. Then smooth the surface.
I did barely get the coil below the surface, this may be the issue. I did use a file to knock off the edge but maybe not enough.
Offline
Kristang wrote:
Thanks Barnett. I'm just thankful I was able to determine what was causing the issue. I'm going to get a piece of steel as you suggested and use the adhesive spray and sandpaper. DC thanks for the file suggestion, there's just so little room to work. I'll get it yet!!!
I still have the issue of the thermostat surface being above the relief in the housing. Barnett, do I just modify the one gasket to clear?
no prob your welcome . . DC's idea is good too . . mine is just a different and maybe more "fool" roof method thats harder to screw up...i hope, lol.
the intake will trap the t stat so you do not need the second gasket, also, as i mentioned earl;ier, two gaskets can cause the housing to bend when tightened.
if you open the hole in the gasket then lay it on top and see if it is above, even or below the gasket surface, you will know what you need . . the t stat must be at least .010" below the gasket surface . . you may just need 1, you may need 2.
Last edited by barnett468 (3/25/2015 7:42 PM)
Offline
.
did you also remove the o ring from the bypass tube then tighten it up then try to install the bolts in the t stat housing then if they fit then barely tighten them and use a feeler gauge to check for gaps as i previously suggested?
REMEMBER!!! When posting a question about your Mustang or other Ford on this forum, BE SURE to tell us what it is, what year, engine, etc so we have enough information to go on. |